Packing for a backpacking trip always gives me a little bit of anxiety. Even after nearly 20 years of backpacking, I still find myself double-checking my gear pile before I leave home, wondering if I’ve forgotten something important. The difference now is that I’ve learned exactly what I need to be safe and comfortable in the backcountry and what I can leave behind.
When I first started backpacking, I made every mistake in the book. I’d pack extra outfits, bring way too much food and toiletries, and throw random items (like a bluetooth speaker or heavy solar panel) into my backpack because I was worried I might need them. The result was a pack that felt ridiculously heavy and trips that were much harder than they needed to be.
Over the years, I’ve backpacked more than a thousand miles throughout the American West, including a thru-hike of the John Muir Trail and countless multi-day trips in California’s Sierra Nevada, Utah’s canyon country, and the Rocky Mountains. With every trip, I’ve refined my backpacking gear list, gradually cutting out unnecessary weight while keeping the items that make the biggest difference in my comfort and safety.
The backpacking checklist below is the exact framework I use when packing for a typical 3-day backpacking trip. It includes all of the essentials you’ll need – your shelter, sleep system, cooking gear, clothing, safety equipment, and toiletries – as well as a few lightweight luxury items that I personally bring on most trips.
If you’re new to backpacking, don’t feel like you need to own every item on this list before you get started. Focus on the basics, borrow gear when you can, and remember that experience is ultimately the best teacher. After every trip, you’ll learn something new about what works for you and what doesn’t.
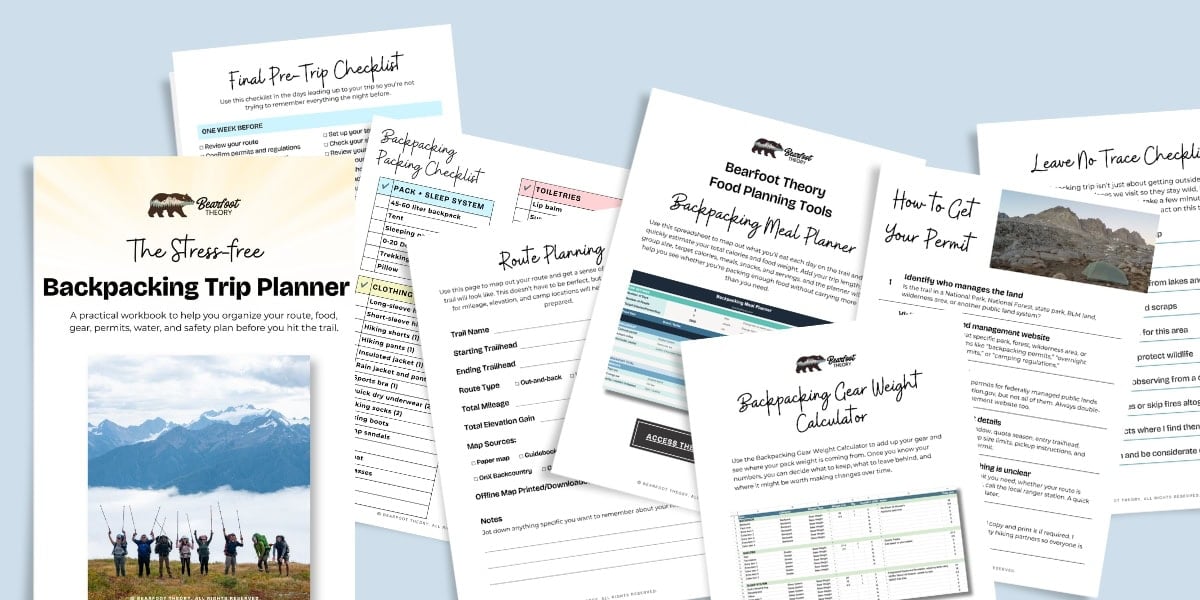
To make packing easier, I’ve also created a free printable backpacking checklist that you can download and save for future trips.
Quick Takeaways
3-Day Backpacking Checklist: The Essentials
If you’re short on time, here’s what you need for a typical 3-day backpacking trip:
Essential Backpacking Gear
- Backpack
- Tent or shelter
- Sleeping bag or backpacking quilt
- Sleeping pad
- Trekking poles
Cooking & Water
- Backpacking stove and fuel
- Water filter
- Water bottles or reservoirs
- Mug
- Spoon
- Food and snacks
- Lighter
- Bear canister (where required)
Safety Gear
- GPS communication device
- Headlamp
- First aid kit
- Navigation tool / paper map
- Multi-tool
- Pack liner
Bathroom Kit
- Trowel
- Toilet paper & ziplock bag
- Kula Cloth (for women)
- Hand sanitizer
Toiletries
- Sunscreen
- Lip balm
- Toothbrush and toothpaste
- Bug spray
- Prescription meds
- Period products
Clothing
- Hiking shirt
- Hiking shorts or pants
- Insulating layer
- Rain jacket
- Socks and underwear
- Sports bra
- Hiking shoes or boots
- Camp sandals
- Sun hat
- Sunglasses
Optional Items
- Pillow
- Quick-dry towel
- Portable battery pack
I’ve included my specific gear recommendations, packing tips, and the mistakes I’ve learned to avoid after more than 1,000 miles of backpacking further down in this guide.
This post may contain affiliate links.
Save this post!
Enter your email & I’ll send this post to your inbox! You’ll also receive my weekly newsletter full of helpful advice for planning your adventures.
Before You Start Packing
Before you start tossing gear into your backpack, there are a few things you should figure out first. The answers to these questions will determine what you actually need to bring and can help you avoid carrying unnecessary weight.
1. Check the Weather Forecast
The forecast is the biggest factor in determining what clothing and gear you’ll need. A summer backpacking trip in Utah requires a very different packing list than a shoulder-season trip in the Rockies.
Pay close attention to:
- Overnight low temperatures
- Chance of rain
- Wind forecasts
- Afternoon thunderstorms
- Snow conditions (if hiking in the mountains)
Remember that weather can change quickly in the backcountry, so it’s wise to pack layers even if the forecast looks perfect.
2. Research Water Availability
Knowing where you’ll find water along your route can significantly reduce how much weight you need to carry.
Before every backpacking trip, I research:
- Reliable water sources
- Distance between sources
- Seasonal water availability
- Recent trip reports
On some trails where water is readily available, I only need to carry a liter at a time. In dry desert environments, I may need to carry several liters between sources.
3. Understand Food Storage Requirements
Many backpacking destinations, like those in Yosemite or Sequoia, have specific food storage regulations.
Some areas require:
Check local regulations before your trip so you aren’t surprised at the trailhead.
4. Know Your Route
I always download or study my route before leaving home.
Make sure you know:
- Daily mileage
- Elevation gain
- Campsite options
- Water sources
- Bailout routes
- Permit requirements
The more familiar you are with your route, the more confident you’ll feel in your gear choices once you’re on the trail.
5. Do a Trial Pack
One of the best backpacking habits I’ve developed is packing everything a day or two before I leave.
This gives me time to:
- Make sure everything fits
- Identify anything I’ve forgotten
- Remove unnecessary items
- Check that my gear is in working order
It’s also a great opportunity to weigh your pack and make adjustments before you hit the trail.
Once you’ve worked through these five steps, you’re ready to start packing.
Go Backpacking Without the Overwhelm!
Get my free fillable planner with meal planning tools, packing checklists, a food database, a pack weight calculator, and more!
The Biggest Gear Mistake New Backpackers Make
The most common mistake I see beginner backpackers make isn’t forgetting something important…it’s bringing too much.
When you’re new to backpacking, it’s easy to pack for every possible scenario. An extra shirt or two in case they get dirty. Full-size and unnecessary toiletries. Way too much food. I no longer drink alcohol, but when I hiked the John Muir Trail, I brought an entire fifth of whiskey!
Before you know it, your backpack weighs 50 pounds.
Today, my goal is simple: carry everything I need to stay safe, warm, dry, and well-fed, and nothing more.
For a typical 3-day backpacking trip, that usually means one outfit for hiking, one dry set of clothes for camp and sleeping, a shelter, a sleep system, a way to filter water, and enough food to comfortably fuel the miles ahead. Everything else has to justify its place in my backpack.
As you work through this backpacking checklist, resist the urge to add a bunch of extra items that aren’t on the list. Your future self will thank you on the uphill sections.
For a typical 3-day backpacking trip, most hikers will carry a pack that weighs between 20 and 35 pounds, including food and water.
A few things that can significantly impact your pack weight include:
- How much water you’re carrying
- Whether a bear canister is required
- The weather forecast
- The weight of your backpacking gear
- How many luxury items you decide to bring
For example, a backpacking trip in California’s Sierra Nevada often requires carrying a bear canister, which can add 2–3 pounds before you even put food inside. On desert trips, I may carry several liters of water between sources, which can add another 5–10 pounds to my pack.
Because factors like food, water availability, weather, and bear canister requirements can vary so much, it’s difficult to give an exact target pack weight. Rather than chasing a specific number, I focus on bringing everything I need and nothing I don’t.
My typical base weight is about 16–17 pounds before food and water (not including my camera gear).
After years of backpacking, I’ve found that a few strategic gear upgrades can dramatically improve your experience on the trail. Upgrading from a heavy tent, sleeping bag, or backpack to a lighter alternative can easily shave several pounds off your pack weight, making steep climbs and long days much more enjoyable.
If you plan to backpack regularly, those are the pieces of gear I’d prioritize investing in first. You’ll carry them on every trip, and the weight savings add up quickly.
The backpacking checklist below includes the gear I currently use for most 3-day backpacking trips, along with recommendations for building a setup that’s lightweight, comfortable, and practical.
The Big 3: Where Weight Savings Matter Most
If you’re planning to backpack regularly, the biggest impact you can make on your overall pack weight is by focusing on your backpack, shelter, and sleep system. Often referred to as the “Big 3,” these items typically make up the majority of your base weight and are where you’ll see the biggest payoff from upgrading to lighter gear.
The gear below reflects my current backpacking setup after years of upgrading and refining my kit. If you’re new to backpacking, don’t let these recommendations scare you off. I accumulated this gear over many years, and I started with much heavier, less expensive equipment as I was figuring out whether backpacking is something I wanted to do regularly.
Backpack
For most 3-day backpacking trips, I recommend a pack that’s 45–60 liters with a supportive hip belt and enough structure to comfortably carry your gear. I also appreciate packs with plenty of pockets since I like having quick access to essentials like snacks, my phone, and navigation tools throughout the day.
- Women’s Pick: REI Flash 55 (2 lb 10 oz)
- Why I Use It: The REI Flash 55 hits the sweet spot between a traditional backpacking pack and an ultralight pack. It weighs under 3 pounds but still provides enough support to carry loads up to 35 pounds. I also love the pocket layout, especially the large hip-belt pockets where I keep my phone, map, and snacks so I can access them without taking my pack off.
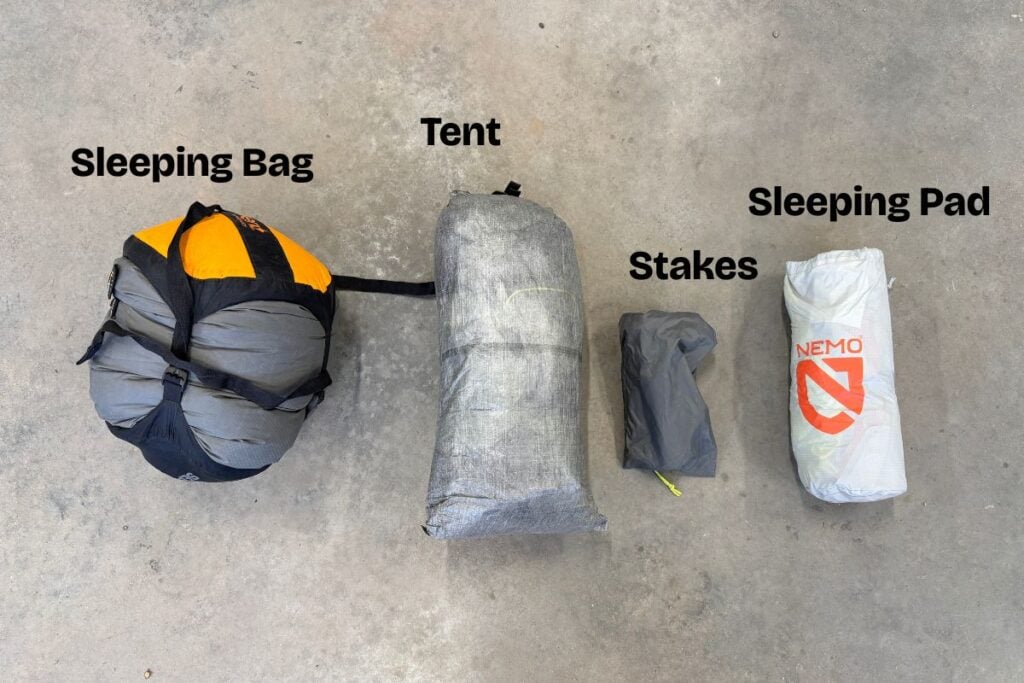
Shelter
When it comes to backpacking shelters, I look for three things: something that can withstand the elements, is spacious enough that we don’t feel cramped, and doesn’t add unnecessary weight to my pack. Over the last few years, I’ve switched to a trekking pole-supported tent, which eliminates the need to carry dedicated tent poles and significantly reduces weight without sacrificing comfort or weather protection.
- My Pick: Zpacks Triplex (3-person)
- Weight: 21.7 oz
- Why I Use It: I’ve found that the Zpacks Triplex offers the best combination of weight, interior space, and weather protection of any tent I’ve used. My partner and I use the 3-person version because it gives us enough room for our gear and dogs without feeling cramped. At just over 21 ounces, it’s significantly lighter than most backpacking tents, and despite its ultralight design, I’ve found it to be remarkably durable in everything from mountain thunderstorms to windy desert campsites. See my full Zpacks review here.
Sleep System
When it comes to sleep systems, I’ve become a huge fan of backpacking quilts. I find them lighter, less restrictive, and more comfortable than traditional mummy bags while still keeping me just as warm. Whether you choose a quilt or sleeping bag, I recommend selecting a temperature rating that’s about 20 degrees lower than the coldest overnight temperature you expect to encounter. For example, if the forecast calls for a low of 40°F, I’d bring a 20°F bag or quilt to ensure I’m comfortable.
I pair my quilt with an insulated sleeping pad that provides both cushioning and protection from the cold ground below. For most 3-season backpacking trips, I recommend choosing a pad with an R-value of at least 4.
- My Pick: Enlightened Equipment Revelation Quilt (10 degree) + NEMO Tensor All-Season Sleeping Pad (regular-wide)
- Weight: Quilt: 25.95 oz | Pad: 19 oz
- Why I Use It: A comfortable sleep system is worth its weight in gold after a long day on the trail. I switched from a traditional sleeping bag to the Enlightened Equipment Revelation Quilt several years ago and haven’t looked back. It’s lighter, less restrictive, and more comfortable for the way I sleep. I pair it with the NEMO Tensor All-Season Sleeping Pad, which provides excellent insulation and cushioning while packing down surprisingly small. Together, they give me a warm, comfortable night’s sleep without adding unnecessary bulk or weight to my pack.
Cooking Gear
I tend to keep my backpacking kitchen setup pretty simple. Most mornings, I’m boiling water for coffee and maybe oatmeal, and in the evenings, I’m usually making a dehydrated backpacking meal. These types of meals are so quick and easy and require very little cleanup. Over the years, I’ve found that keeping my cooking setup lightweight and uncomplicated means less weight in my pack and more time enjoying camp at the end of the day.
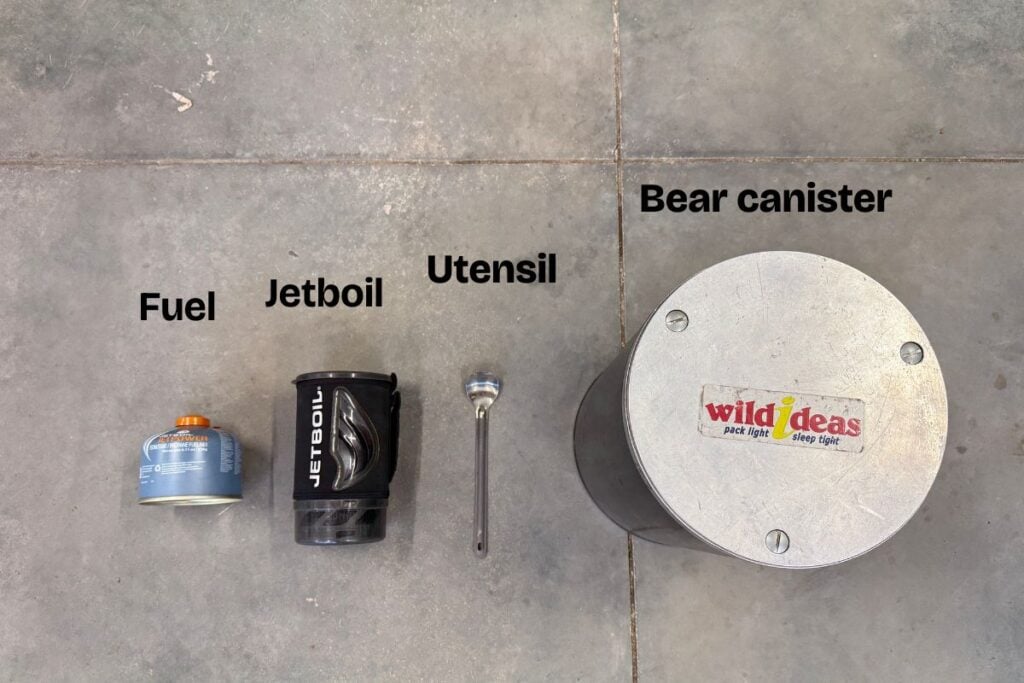
Backpacking Stove
- My Pick: Jetboil Flash
- Weight: 13.1 oz
- Why I Use It: I’m primarily boiling water for coffee, oatmeal, and backpacking meals, so I value speed and efficiency over a more elaborate cooking setup. There are lighter setups, but the Jetboil consistently boils water in just a few minutes and has been incredibly reliable over the years.
Bear Canister
Bear canisters are required in many popular backpacking destinations, including much of California’s Sierra Nevada. Even when they’re not required, I often choose to bring one because they’re the easiest and most reliable way to keep bears, rodents, and other curious critters out of my food while I sleep.
- My Pick: Wild Ideas Bearikade Weekender
- Weight: 31 oz
- Why I Use It: I carried a larger Bearikade on my thru-hike of the John Muir Trail and was immediately sold on the weight savings. Compared to traditional plastic bear canisters, it’s significantly lighter thanks to its carbon fiber construction, which makes a noticeable difference when you’re carrying several days of food. While it’s definitely more expensive than options like the BearVault, Wild Ideas offers an affordable rental program, making it a great option if you only need a bear canister for a specific trip.
Other Cooking Gear
- Spoon: If you’re eating dehydrated meals, a long-handled titanium spoon is all you need. I use the TOAKS Long-Handled Spoon.
- Fuel: For a typical 3-day trip with two people, one 8 oz fuel canister is usually enough.
- Lighter: Even if your stove has an ignition switch, I always pack a lighter as a backup.
- Food: See my favorite lightweight backpacking food ideas here.
- Mug: If you like coffee or other hot drinks, bring a lightweight titanium mug.
Read More
Backpacking Kitchen
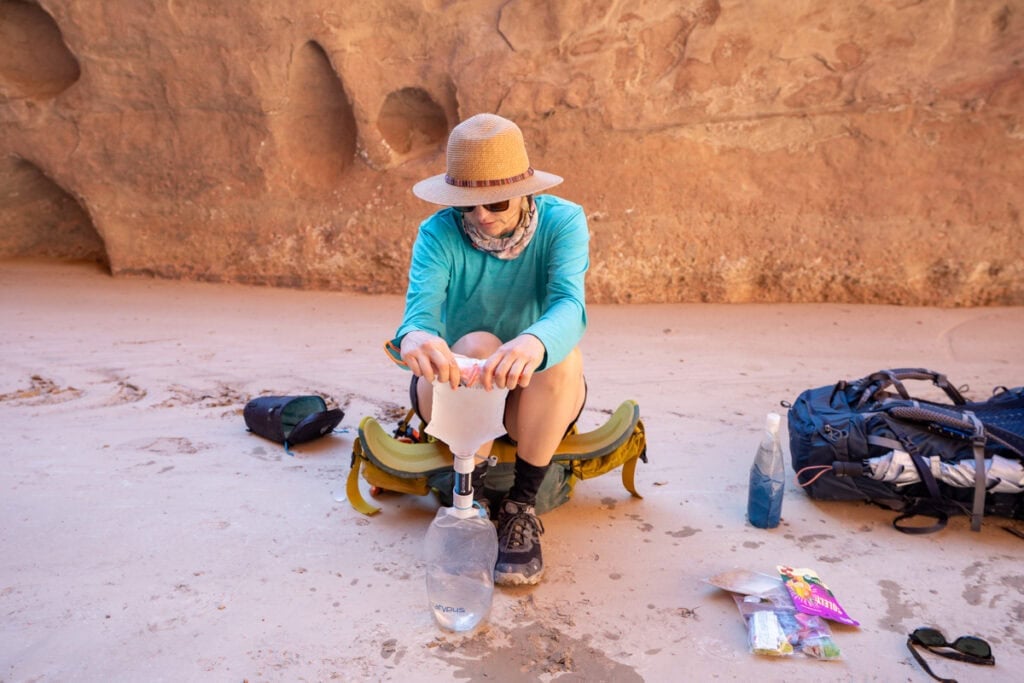
Water Filtration
Access to clean drinking water is one of the most important considerations on any backpacking trip. Before every trip, I research where reliable water sources are located along my route so I can carry enough water without hauling more weight than necessary. Since water weighs 2.2 pounds per liter, having a lightweight filtration system can make a big difference in how heavy your pack feels on the trail.
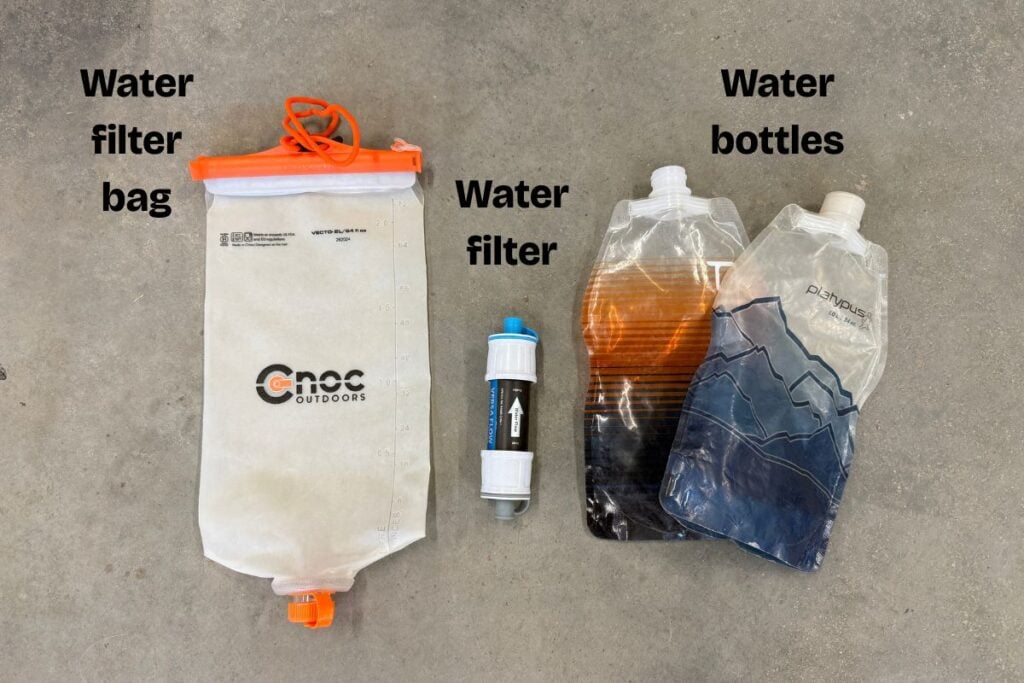
Water Filter
- My Pick: HydroBlu Versa Flow + CNOC Vecto water bag
- Weight: 4.8 oz
- Why I Use It: After years of using the Platypus GravityWorks, I switched to this setup because it’s significantly lighter while still being fast and easy to use. I can squeeze-filter water or hang it as a gravity system depending on the situation, and the entire setup weighs less than 5 ounces.
Water Bottles
- My Pick: Platypus Soft Bottles
- Weight: 1.2 oz
- Why I Use It: I typically like to have the ability to carry up to 3 liters of water, especially in dry environments where water sources can be far apart. These bottles weigh almost nothing and roll up when they’re empty, saving valuable space in my pack.
Safety Gear
These are the safety essentials I carry on every backpacking trip to help me navigate, communicate, and deal with unexpected situations in the backcountry.
Navigation
Before every backpacking trip, I download offline maps to my phone so I can navigate without cell service. I like being able to see my location in real-time, track my progress, and quickly reference nearby campsites, water sources, and alternate routes. On longer trips, I’ll carry a paper map in order to conserve my phone battery. Tip: you can often get a free paper map at the closest ranger station to the trailhead.
- My Pick: AllTrails+ Offline Maps
- Why I Use It: I’ve tried a variety of navigation apps over the years, but I keep coming back to AllTrails because it’s easy to use. I also appreciate being able to download maps ahead of time (with the paid membership), read recent trail reports, and quickly share routes with friends and family before a trip.
GPS Communicator
Once I’m in the backcountry, I assume I won’t have cell service. Having a communication device gives me peace of mind knowing I can stay in touch with family, get updated weather forecasts, and reach emergency services if I ever need them.
- My Pick: Garmin inReach Messenger Plus
- Weight: 4.0 oz
- Why I Use It: While some newer phones now offer satellite SOS capabilities, I still carry a Garmin inReach because it provides reliable two-way messaging, weather forecasts, and location sharing in addition to emergency communication. I also appreciate that it’s a dedicated safety device with significantly better battery life than my phone.
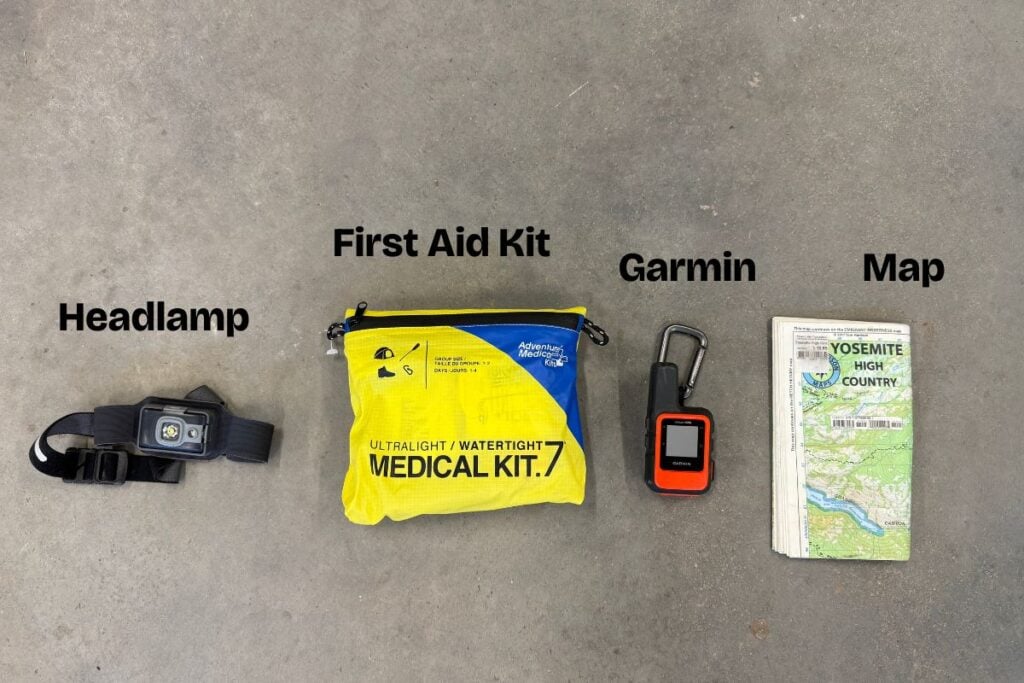
First Aid Kit
I don’t carry a massive first aid kit, but I do want enough supplies to handle common backpacking injuries and illnesses like blisters, cuts, scrapes, and basic medication.
- My Pick: Adventure Medical Kits Ultralight/Watertight .7
- Weight: 8 oz
- Why I Use It: This kit strikes a good balance between being lightweight and well-stocked. It contains the essentials for handling the most common minor backpacking injuries. I restock it before every trip and add any personal medications I suspect I might need. If you don’t want to buy something pre-made, you can also make your own hiking first aid kit.
Headlamp
A headlamp is a backpacking essential that comes on every trip. Whether I’m making coffee before sunrise, cooking dinner after sunset, or heading out for a midnight bathroom break, I end up using mine on just about every trip.
- My Pick: BioLite HeadLamp 400
- Weight: 2.8 oz
- Why I Use It: The BioLite HeadLamp 400 checks all the boxes for me: it’s lightweight, comfortable, easy to adjust, and charges quickly via USB-C. The battery can last up to 200 hours on low and 6 hours on high, which is better than many compact backpacking headlamps.
Multi-Tool
A small multi-tool can come in handy for everything from field repairs and blister care to food prep and other unexpected tasks around camp.
- My Pick: Swiss Army Classic Knife
- Weight: 0.7 oz
- Why I Use It: At less than an ounce, the Swiss Army Classic is incredibly lightweight and small enough that I keep it in my hip belt pocket for easy access. I use the scissors for cutting moleskin and tape, and the tweezers for removing splinters.
Pack Liner
- My Pick: Nylofume Pack Liner
- Why I Use It: Keeping critical gear dry is an important part of staying safe in the backcountry. A wet sleeping bag, extra layers, or insulated jacket can quickly turn an uncomfortable situation into a potentially dangerous one, especially if temperatures drop unexpectedly. That’s why I bring a pack liner whenever there’s a chance of rain. Compared to traditional pack liners, the Nylofume Pack Liner is significantly lighter and doesn’t add unnecessary bulk inside my backpack. It’s also much more durable than a standard trash bag, so I can use the same one for multiple seasons before needing to replace it.
Backpacking Clothes
One of the biggest mistakes I made when I first started backpacking was packing too many clothes. Backpacking is one of those activities where everyone gets dirty, and carrying extra clothing adds weight quickly.
These days, for most 3-day trips, I pack one outfit for hiking, one dry set of clothes for camp and sleeping, and a few layers that can be added or removed depending on the weather.
The clothing recommendations below are the pieces I personally wear on backpacking trips. While I’m linking to women’s gear, many of these items are also available in men’s versions.
Long-Sleeved Sun Shirt (1)
- Women’s Pick: Patagonia Long-Sleeved Capilene Cool Daily Shirt (4.8 oz)
- Why I Use It: If I’m backpacking, there’s a good chance I’m wearing this shirt. It provides excellent sun protection while remaining lightweight and breathable, even on hot summer days. I also like that it dries quickly, doesn’t stink, and avoids the need for tons of sunscreen. Note: This also comes in a hooded version that is great for providing neck coverage if you prefer normal baseball-style hats.
Short-Sleeve Shirt (1)
- My Pick: Patagonia Capilene Cool Daily Shirt (4.3 oz)
- Why I Use It: I like having a dry shirt to change into at camp and sleep in at night. The Capilene Cool Daily Shirt is lightweight, comfortable against the skin, and dries quickly if I need to wash it on longer trips.
Hiking Shorts (1)
- My Pick: REI Swiftland 6″ Running Short Tights (4.6 oz)
- Why I Use Them: The stretchy fabric moves with me and never feels restrictive, even on steep climbs or scrambly terrain. The elastic waistband is comfortable under my backpack’s hipbelt. The large side pockets are perfect for carrying my phone, and the fitted design eliminates chafing, making them an easy choice for long days on the trail.
Hiking Pants (1)
- My Pick: Mountain Hardwear Dynama Pants (8.3 oz)
- Why I Use Them: I like these hiking pants for cooler temperatures, buggy conditions, or overgrown trails. The Dynama Pants are breathable, stretchy, and comfortable enough that I can also wear them around camp or sleep in them on colder nights, which means I don’t need to pack a separate pair of pants.
Insulated Jacket
- My Pick: Arc’teryx Atom Hoody (11.3 oz)
- Why I Use It: The Atom is one of the most versatile jackets I own. It’s warm enough for cool mornings and evenings around camp, but breathable enough that I can often keep it on while hiking when temperatures are chilly. For most summer backpacking trips, it allows me to simplify my layering system by carrying a single insulated jacket instead of both a fleece and a puffy.
Rain Jacket
- My Pick: Outdoor Research Aspire 3L Jacket (13.6 oz)
- Why I Use It: The Aspire provides dependable waterproof protection without sacrificing comfort. I especially love the full-length side zips, which allow me to dump heat quickly when I’m hiking uphill. It’s lightweight enough for backpacking but durable enough that I don’t worry about it getting damaged on overgrown trails or during rough weather.
Rain Pants (Optional)
- My Pick: REI Co-op Rainier Rain Pants (8.5 oz)
- Why I Use Them: I don’t always pack rain pants, but I bring them when I’m expecting cold temperatures, sustained rain, or shoulder-season conditions. The budget-friendly Rainier Pants are lightweight, pack down small, and have full-length side zippers, which make them easy to put on over my hiking shoes and clothing without having to stop and change. These can also provide added warmth while sitting around camp at night.
Sports Bra (1)
- My Pick: Nike Swoosh Sports Bra
- Why I Use It: I like the simple design and the fact that there are no metal clasps or strap adjusters that can become uncomfortable under a backpack. It’s supportive, comfortable, and dries quickly on the trail.
Underwear (2 pairs)
- My Pick: Tommy John Second Skin High Rise Brief (1.5 oz)
- Why I Use It: After trying a lot of hiking underwear over the years, I’ve found these strike a nice balance between comfort and performance. They stay put without riding up, and the smooth fabric minimizes visible panty lines under leggings and hiking tights. They’re also lightweight, breathable, and dry quickly after washing on longer trips.
Hiking Socks (2 Pairs)
- My Pick: Darn Tough Hiker Micro Crew Cushion Socks (2.6 oz)
- Why I Use Them: I wore these on the John Muir Trail and haven’t looked back. Unlike some hiking socks that slide around and bunch up inside your shoes, these stay put all day and do a great job of managing moisture, helping prevent hot spots and blisters.
Hiking Footwear
- My Pick: Oboz Katabatic LT Mid GTX Hiking Boots (14.1 oz per boot)
- Why I Use Them: I’ve gone back and forth between trail runners and traditional hiking boots over the years, and the Katabatic LT feels like the best of both worlds. I appreciate the added ankle support and waterproof Gore-Tex lining, but they still feel lightweight and nimble on the trail.
Camp Shoes
- My Pick: Teva Hydratrek Sandals (23 oz for the pair)
- Why I Use Them: After hiking all day, the first thing I want to do when I get to camp is take off my boots. The Teva Hydratrek sandals give my feet a chance to breathe while still providing enough traction and support for creek crossings, exploring around camp, or those inevitable midnight bathroom trips.
Hat (1)
- My Pick: Wallaroo Sedona Hat (3.4 oz)
- Why I Use It: A wide-brimmed hat provides more sun protection than a baseball cap, especially for my face, ears, and neck. When I’m spending long days above treeline, I notice a big difference.
Sunglasses (1)
- My Pick: ROKA Rory Sunglasses
- Why I Use Them: I’ve worn the ROKA Rory sunglasses for years because they’re incredibly lightweight and stay put no matter how much I sweat. The nose pads are comfortable enough that they don’t dig in, even when I’m wearing a hat all day, and they’re so light that I barely notice I have them on.
Additonal Clothing Items
- Buff: I like to hike with a Buff to keep the sun off my neck. I also like to dip it in the water on hot days to keep my neck cool.
- Gloves: If your hands get cold at night, you can pack a pair of gloves
- Beanie: I usually just use the hood on my jacket, but a beanie is also nice to have
Read More
Backpacking Clothes
Bathroom Supplies
Bathroom supplies are an essential part of any backpacking trip. Not only do they help you follow Leave No Trace principles and protect the places you’re visiting, but they also make your bathroom experience in the backcountry cleaner, more comfortable, and a lot less stressful.
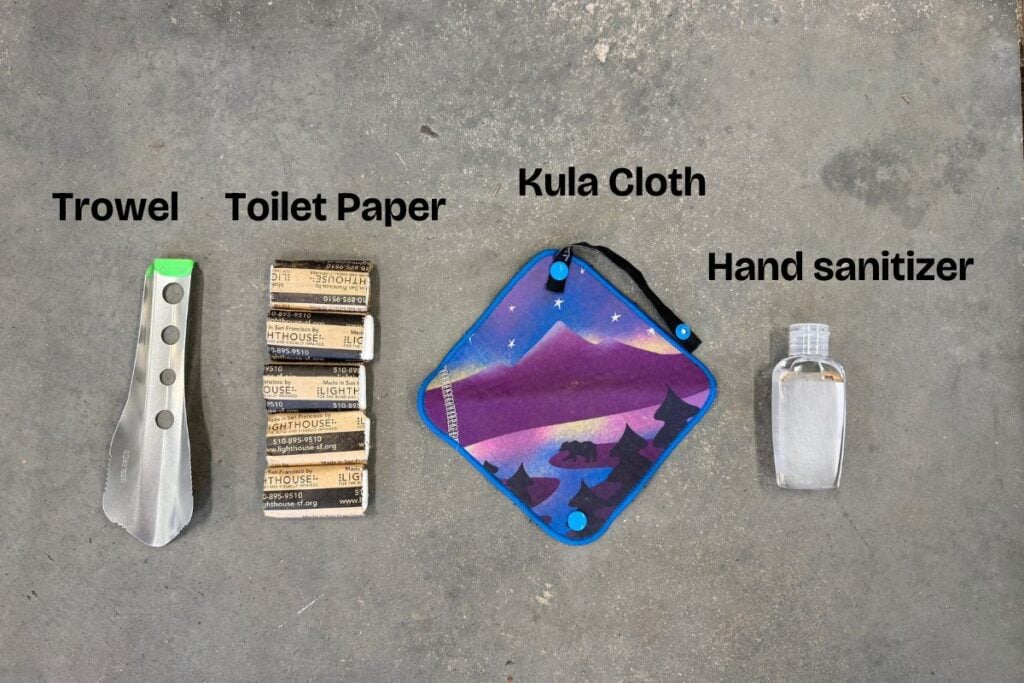
Pee Rag
- My Pick: Kula Cloth (0.5 oz)
- Why I Use It: If you’re a woman, a pee rag is one of those backpacking items that can make life on the trail a lot easier. Instead of using (and packing out) toilet paper every time you pee, a pee rag helps you stay cleaner, reduce waste, and minimize the amount of toilet paper you need to carry. The Kula Cloth (full review here) is antimicrobial, easy to clean, dries quickly, and snaps shut so the absorbent side stays covered when it’s attached to my backpack.
Trowel
- My Pick: BoglerCo Ultralight Trowel (0.48 oz)
- Why I Use It: A trowel is an essential Leave No Trace item that allows you to properly bury your poop in areas where catholes are permitted. At less than half an ounce, the BoglerCo Trowel is incredibly lightweight, but what I really appreciate is how well it digs. The serrated edge cuts through roots and compact soil much more easily than many ultralight trowels I’ve used, making bathroom breaks a little quicker and less frustrating.
Other Bathroom Supplies
I keep all of my bathroom supplies and ziplock with my used TP in a bag like this (the wide size works great!).
- Toilet paper for going poop
- Zip-lock bag for packing out used toilet paper
- Hand sanitizer
Toiletries
My routine while backpacking is pretty limited and is focused purely on hygiene, and that is reflected in this backpacking checklist. No deodorant, no makeup, etc.
- Sunscreen: I always carry a small bottle of sunscreen, especially when hiking above treeline where sun exposure can be intense.
- Lip Balm with SPF: I use Jack Black and it helps keep my lips from cracking and getting sunburnt
- Bug Spray: I try to rely on long sleeves and pants first, but when the bugs are particularly bad, a small bottle of bug spray can make a huge difference in my comfort level.
- Toothbrush & Toothpaste: A travel toothbrush and the right number of toothpaste tablets are all you need.
- Prescription Medications: Don’t forget any medications you take regularly.
- Contacts, Glasses, or Contact Solution: If applicable.
- Menstrual Products: If needed for your trip.
- Body Wipes (Optional): I pack 1-2 of these compressed Pact wipes per day. You just add water and they expand. They are nice for cleaning up after going #2, if I’m on my period, or for wiping the dirt off my face at night.
- Small hairbrush (Optional): If you have long hair, wearing it in braids can help avoid tangles. However, this lightweight hiker hairbrush is nice to keep things from getting too knotted up.
Optional Items
While I could backpack without the items below, I’ve found they add enough comfort and convenience that they usually make it into my pack. Whether they’re worth bringing on your trip comes down to your personal preferences and how much weight you’re willing to carry.
Trekking Poles
- My Pick: Black Diamond Distance Z Trekking Poles (12.5 oz/pair)
- Why I Use Them: Trekking poles are one of those pieces of gear that not every backpacker uses, but I’ve become a huge fan of them over the years. They help take pressure off my knees on long descents, improve my stability on rocky trails, and make me feel more secure during stream crossings. Since I use a trekking pole-supported tent, they’re also an essential part of my shelter setup. The Distance Z poles are lightweight, durable, and collapse down small when I’m not using them.
Pillow
- My Pick: NEMO Fillo Elite Pillow (2.8 oz)
- Why I Bring It: I sleep much better with an actual pillow than I do with a stuff sack full of clothes. I pair the NEMO Fillo Elite with a Pillow Strap from Garage Grown Gear, which solves one of my biggest frustrations with backpacking pillows—waking up in the middle of the night to find it has slid off my sleeping pad.
Portable Battery Pack (Optional)
- My Pick: Nitecore NB10000 (5.3 oz)
- Why I Bring It: Between my phone, GPS communicator, headlamp, and camera gear, I usually carry a battery pack on backpacking trips. The Nitecore NB10000 provides plenty of power for several days while weighing just over 5 ounces, making it one of the lightest 10,000 mAh battery packs available. I don’t always need it on a short overnight trip, but it’s nice knowing I can recharge essential devices if needed.
Quick-Dry Towel (Optional)
- My Pick: REI Co-op Multi Towel Lite (6.5 oz)
- Why I Bring It: A towel is nice to have for swimming, wiping down condensation inside my tent, or cleaning gear. The REI Multi Towel Lite is one of the lightest towels I’ve found for its size, dries quickly, and packs down small enough that I barely notice it’s in my backpack.
Backpacking Gear I Leave at Home
One of the biggest lessons I’ve learned over the years is that every item in your backpack needs to earn its place. If something isn’t helping me stay safe, comfortable, or well-fed, I’m probably leaving it behind.
Here are a few things I used to pack that rarely make it into my backpack anymore:
- Camp Chair: I know some backpackers love them, but I’ve found I can usually make do with a log, rock, or sleeping pad around camp.
- Physical Books: Books are heavy. If I want something to read, I’ll bring my Kindle instead, and even that is rare!
- Solar Panels: I experimented with backpacking solar panels years ago, but I’ve found a lightweight battery pack is almost always lighter, more reliable, and less hassle, especially on shorter trips.
- Extra Changes of Clothes: One hiking outfit and one dry set of clothes for camp and sleeping is usually all I need.
- Full-Size Toiletries: Travel-size versions work just fine and can save a surprising amount of weight and space.
- Too Much Food: This is one mistake I still occasionally make. It’s easy to pack extra snacks “just in case,” but food weight adds up quickly.
Of course, every backpacker has different priorities. If carrying a camp chair, a favorite book, or an extra luxury item makes your trip more enjoyable, go for it. The goal isn’t to have the lightest pack possible—it’s to carry the things that add value and leave behind the things that don’t.
Final Thoughts
If there’s one thing I’ve learned after more than 1,000 miles of backpacking, it’s that carrying less stuff usually leads to a better experience.
When you’re first getting started, it’s easy to worry about forgetting something important and overpack as a result. I certainly did. But over time, you’ll learn which items you actually use, which ones never leave your backpack, and what makes the biggest difference in your comfort on the trail.
Remember, you don’t need the lightest gear or the most expensive setup to enjoy backpacking. Start with what you have, borrow or rent gear when you can, and focus on getting outside. Every trip will teach you something new, and before long you’ll have a backpacking system that works for you.
To make packing easier, don’t forget to download my free Backpacking Starter Kit, which includes a printable backpacking checklist, backpack weight calculator, and food planner.
Save this post to Pinterest
What’s on your backpacking checklist that I missed? Is there anything you’d add or subtract? Do you have any questions about what to bring backpacking? Let me know in the comments below.